Difference between revisions of "Status Board"
Boxofstops (Talk | contribs) |
Boxofstops (Talk | contribs) (→Assigning buttons) |
||
| Line 34: | Line 34: | ||
If you want to track which controls are assigned to which buttons, the Status Board is designed to be written on with a drywipe marker. | If you want to track which controls are assigned to which buttons, the Status Board is designed to be written on with a drywipe marker. | ||
| − | Alternatively, as shown in the picture above, another solution is to print the layout. For example, edit and cut out this | + | Alternatively, as shown in the picture above, another solution is to print the layout. For example, edit and cut out this <googa>http://boxofstops.com/layouts/status-board-sample-registration.docx|Word document</googa> (file scanned for viruses, but please do so too). |
{{timeout|Status Board}} | {{timeout|Status Board}} | ||
Latest revision as of 07:40, 1 October 2017
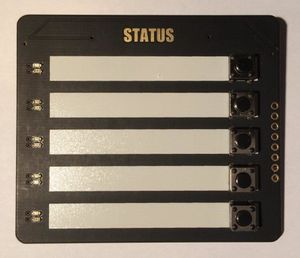
The Status Board from The Pi Hut is just about the simplest and most affordable controller available for Box Of Stops.
While it was clearly not designed with this in mind, the combination of five input buttons (available cheaply separately), each with two related LEDs is ideal to drive a few controls in Box Of Stops.
To make best use of the buttons, typically they are assigned to combinations, but in fact they are just normal triggers in Box Of Stops - couplers and stops can be assigned too. Then the LEDs on the Status Board will show which buttons are active and/or playing.
Contents
[hide]What to buy
To use the Status Board with Box Of Stops you will need:
- The Status Board itself
- Some 6mm buttons
The buttons can then be plugged into the available sockets on the right of the board.
Configuring
To enable a Status Board in Box Of Stops, please edit the Application properties, and set the gpio.board value to StatusBoard :
gpio.board = StatusBoard
This will reconfigure the necessary Gpio inputs and outputs for the LEDs. There is no need to change the pi.input.pins property described in the Gpio button section.
Then plug in the Status Board and restart. When Box Of Stops detects the board, it will play a short animation on the LEDs to confirm everything is working.
Assigning buttons
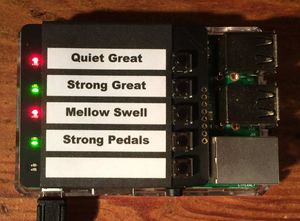
To assign a button on the Status Board, just press that button while adding a trigger to any stop, coupler or combination. Once you OK the screen, the red LED for that button will light, to indicate the control is available.
Then press the chosen button to toggle its related control - the green LED will show while it is playing, and the red LED while it is off.
If you want to track which controls are assigned to which buttons, the Status Board is designed to be written on with a drywipe marker.
Alternatively, as shown in the picture above, another solution is to print the layout. For example, edit and cut out this Word document (file scanned for viruses, but please do so too).
Timeout
After 10 minutes of inactivity, Box Of Stops will automatically timeout the lights on the Status Board.
It will wake up again when activity is next detected. This could be anything, e.g. a button on the Status Board, or a note being pressed on a keyboard.
If you wish to change the 10 minute default, please look for the midi.timeout.minutes value in Application properties.

